HP OfficeJet Pro 8600 Printers - Loading Paper, Envelopes
HP OfficeJet Pro 8600 Printers - Loading Paper, Envelopes
This document is for the following printers.
|
HP Officejet Pro 8600 e-All-in-One Printer (N911a)
|
HP Officejet Pro 8616 e-All-in-One Printer
|
|
HP Officejet Pro 8600 Premium e-All-in-One (N911n)
|
HP Officejet Pro 8625 e-All-in-One Printer
|
|
HP Officejet Pro 8615 e-All-in-One Printer
|
HP Officejet Pro 8640 e-All-in-One Printer
|
|
HP Officejet Pro 8620 e-All-in-One Printer
|
HP OfficeJet 8702 All-in-One Printer
|
|
HP Officejet Pro 8630 e-All-in-One Printer
|
HP OfficeJet Pro 8710 All-in-One Printer
|
|
HP Officejet Pro 8660 e-All-in-One Printer
|
HP OfficeJet Pro 8715 All-in-One Printer
|
|
HP Officejet Pro 276dw Multifunction Printer
|
HP OfficeJet Pro 8717 All-in-One Printer
|
|
HP Officejet Pro 8600 Plus e-All-in-One Printer (N911g)
|
HP OfficeJet Pro 8718 All-in-One Printer
|
|
HP Officejet Pro 8610 e-All-in-One Printer
|
HP OfficeJet Pro 8719 All-in-One Printer
|
You can print on plain or specialty paper. Load plain paper, legal size paper, envelopes, or index cards in the printer's input tray.
NOTE:To purchase paper in the United States and Canada, go to the HP Store.
Load plain paper
Load plain paper into Tray 1 or Tray 2 before you print.
NOTE:Load only U.S. letter, legal, or A4 size paper in Tray 2, if your printer includes Tray 2 as an optional accessory. Specialty paper is not supported in Tray 2.
Load plain paper in Tray 1
Load plain paper into Tray 1 before you print.
-
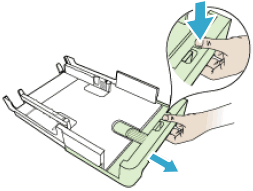
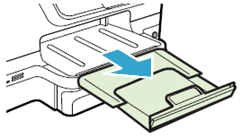
Grasp the handle on the front of Tray 1, then pull the tray toward you to remove it.Figure : Pulling out Tray 1

-
Slide out the paper width guides as far as possible.If you are loading larger-sized paper, pull out the input tray extender to lengthen the tray.Figure : Pulling out the input tray extender
-
Tap a stack of plain paper on a flat surface to align the edges.
-
Make sure all the paper in the stack is the same size and type. Do not load mixed types of paper in the tray. The printer can process only one type of paper at a time.
NOTE:
Do not use paper with paper clips or staples attached. Do not use paper that is bent, torn, dusty, damp, wrinkled, curled, or paper that does not lie flat. -
With Tray 1 outside of the printer, load the stack of paper in portrait orientation with the print-side facing down in the center of the input tray, then slide the stack forward until it stops.Figure : Loading paper into Tray 1
-
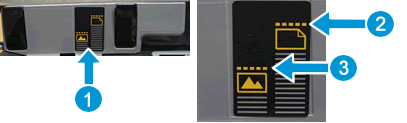
Make sure the paper height does not exceed the maximum height lines on the sides of the tray.Figure : Examples of the paper fill guides inside Tray 1

-
Location of paper fill guides
-
Maximum height for plain paper
-
Maximum height for specialty paper
-
-
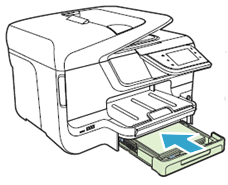
Slide in the paper guides so that they rest against the edges of the paper, then push the tray into the printer until it clicks into place.Figure : Sliding in the paper guides and reinserting the tray into the printer

-
Pull out the tray extender on the output tray, then lift the paper catch.Figure : Pulling out the tray extender on the output tray

Load paper in optional Tray 2
Load plain paper into Tray 2 before you print.
-
Grasp the underside of Tray 2, then pull out the tray from the bottom of the printer.Figure : Pulling out the tray from the bottom of the printer

-
Slide out the paper width guides as far as possible.If you are loading larger-sized paper, pull out the input tray extender to lengthen the tray.Figure : Pulling out the input tray extender
-
With Tray 2 outside of the printer, load the stack of paper in portrait orientation with the print-side facing down in the center of the input tray, then slide the stack forward until it stops.
CAUTION:
Do not load paper while the printer is printing. Jams or paper feed issues might occur. -
Make sure the paper height does not exceed the maximum height line on the sides of the tray.Figure : Example of the paper fill guide inside Tray 2

-
Location of paper fill guide
-
Plain paper fill guide
-
-
Slide in the paper guides so that they rest against the edges of the paper, then push the tray into the printer until it clicks into place.Figure : Reinserting Tray 2 into the printer
-
Pull out the tray extender on the output tray, then lift the paper catch.Figure : Pulling out the tray extender on the output tray
Load specialty paper (photo paper, cardstock)
Load photo paper or cards into Tray 1 before you print, but do not leave photo paper in Tray 1 for extended periods of time. Leaving photo paper in the tray might decrease print quality.
-
Grasp the handle on the front of Tray 1, then pull the tray toward you to remove it.Figure : Pulling out the Tray 1
-
Slide out the paper width guides as far as possible.If you are loading larger-sized paper, pull out the input tray extender to lengthen the tray.Figure : Pulling out the input tray extender
-
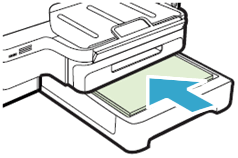
Load the cards or photo paper print-side down in the center of the tray. Make sure the stack of paper is centered in the tray. If you are loading photo paper with a perforated tab along one edge, make sure the tab points toward the front of the printer (position the tab side to be the trailing edge of the paper going into the printer).
-
Make sure the paper height does not exceed the maximum height line on the paper fill guide located inside Tray 1.Figure : Examples of the paper fill guides inside Tray 1
-
Location of paper fill guides
-
Maximum height for plain paper
-
Maximum height for specialty paper
-
-
Slide in the paper guides so that they rest against the edges of the paper. Make sure the paper is centered in the tray.
-
Push the tray into the printer until it clicks into place.Figure : Pushing in Tray 1

-
Pull out the tray extender on the output tray, then lift the paper catch.Figure : Pulling out the tray extender on the output tray
Load envelopes
Load one or more envelopes into Tray 1 before you print, but do not load more than five envelopes at a time. Do not use shiny or embossed envelopes or envelopes that have clasps or windows.
-
Grasp the handle on the front of Tray 1, then pull the tray toward you to remove it.Figure : Pulling out Tray 1
-
Slide out the paper width guides as far as possible.If you are loading larger-sized envelopes, pull out the tray extension to lengthen the tray.Figure : Pulling out input tray extension
-
Load the envelopes into the center of the tray with the envelope flap on the left and facing up. If the flap is on the short end of the envelope, load the envelope into the center of the tray with the flap toward the printer and facing up.Figure : Example of envelope orientation for loading into Tray 1

-
Slide in the paper width guides to rest against the edges of the envelope. Make sure the envelope is centered in the tray.
-
Push the tray into the printer until it clicks into place.Figure : Pushing in Tray 1
-
Pull out the tray extender on the output tray, then lift the paper catch.Figure : Pulling out the tray extender on the output tray
https://support.hp.com/us-en/document/c02890475
Comments
Post a Comment